|
|
Post by pete on Aug 19, 2020 15:56:07 GMT -7
|
|
|
|
Post by poet on Aug 20, 2020 8:33:51 GMT -7
Good looking project!
|
|
|
|
Post by pete on Aug 20, 2020 9:41:03 GMT -7
Thanks Dennis...LOL...Its already proving to be a P.I.T.A. Progress (Or lack there of) will be forthcoming...Stay tuned!!
|
|
|
|
Post by lowlife on Aug 20, 2020 9:55:08 GMT -7
Looking forward to it Pete, looks to be a real detailed build !
|
|
|
|
Post by pete on Aug 20, 2020 10:04:25 GMT -7
What you see is the "Tip of the iceberg" My friend...
|
|
|
|
Post by pete on Aug 20, 2020 10:18:53 GMT -7
|
|
|
|
Post by mustang1989 on Aug 21, 2020 4:55:37 GMT -7
You know I'm not gonna miss the fun involved in this one!! This is going to be GREAT!!!!
|
|
|
|
Post by pete on Aug 21, 2020 9:26:36 GMT -7
Fun!? LOL...This things already thrown me a curve ball Joe!...
|
|
|
|
Post by pete on Aug 21, 2020 9:54:33 GMT -7
OK todays installment: Body work and a WTF!? Yeah, well...Not much to see in the body work department. The main body consists of 3 parts. The lower sides/tub and rear fairing. The other component is the top of the body and the cockpit cover. I bonded the two lower/rear halves together using some Tenax 7R after beveling the edges of the seam. (Gotta have someplace to put the filler so it stays put and 'Fills" the seam) Sorry I didn't take a pic of the process, mind was elsewhere. I cut the cockpit cover off the upper body panel in an effort to add some depth and realism to the finished product. (Ill give you an example later on) Also, noticed from the get go that the upper panel was warped. No big deal right? We have all faced this a time or two. Just boil up some water, give it a quick dunk and straighten it out, splash of cold water and Bobs your uncle!...Right...  40 yr old brittle plastic...Sheesh, I didn't even get a chance, no warning at all! As soon as the part hit the water...BAM!!.Yeah, it looks like a discarded orange banana peel  ..LOL...(In my best Foghorn Leghorn voice) "Fortunately I have an extra kit for just such an occasion" Its still out of production and was factory sealed but...Well... You'll see...Stay tuned sports fans!!!     Next installment: Que the announcer voice...Can it be saved? will the build come to a screeching halt!? Tune in tomorrow...Same Bat time! Same Bat channel! |
|
|
|
Post by pete on Aug 21, 2020 14:56:55 GMT -7
As I stated earlier, Adding more depth and realism to a model. In this case, these dragster kits tend to have one or at most two piece bodies. The Ivo car is an exception to the rule but a classic example is the "Young American" Front eng dragster kit and the numerous variations of this kit. The body in front of the engine is one piece (The nose is a separate piece) and has no belly pan/underside to it. Limits your choices for a display model. Body on showing just the exterrior look or, body off showing a bare chassis...Yawn...The Jade Grenade you see here was the Young American kit. I added a belly pan to the one piece slip on body with some styrene sheet. Then proceeded to cut the body up so as to have multiple removable panels and a visible bottom to the car when the panels were off. Much less boring, don't you think??   |
|
|
|
Post by pete on Aug 22, 2020 13:25:36 GMT -7
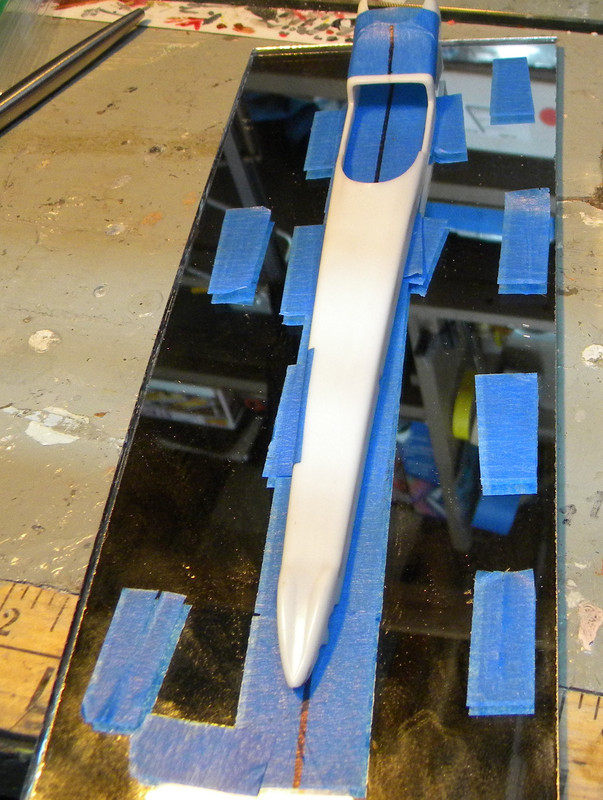
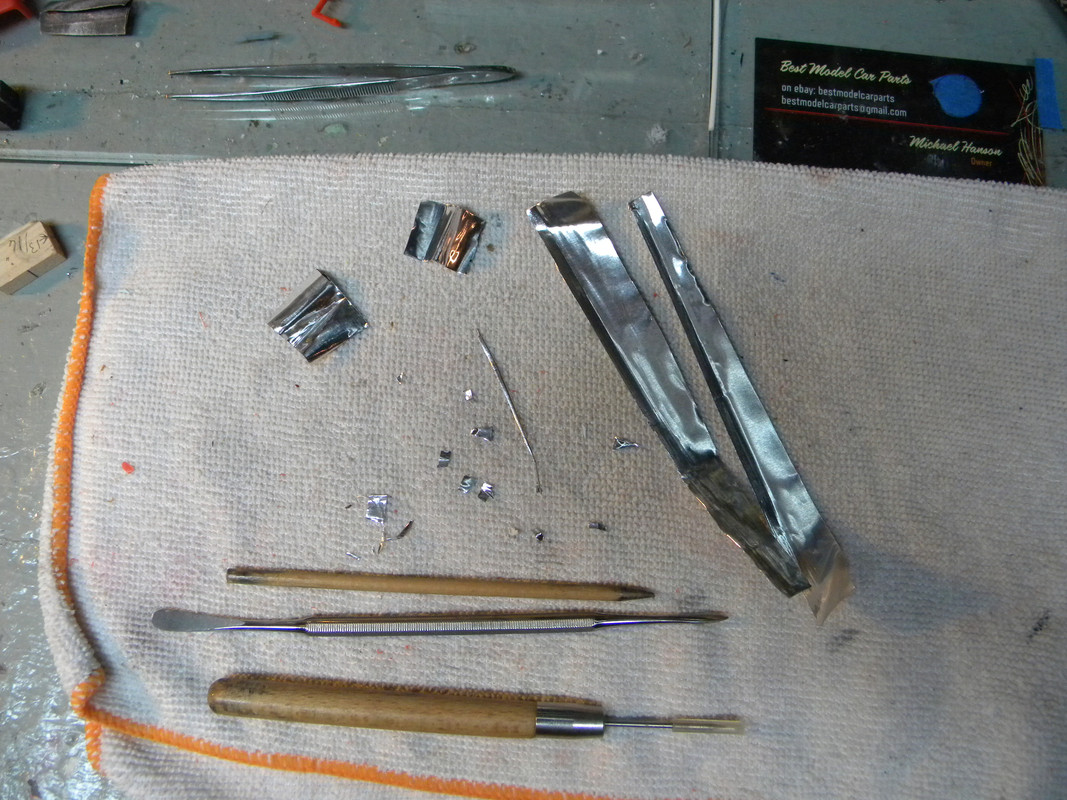
Todays installment: Can the kit be saved? Sure! But I don't want to pirate parts from another out of production kit soo...I am going to hand form (with a buck) a tin upper body panel for this build. First I had to center/mount the buck on a square flat surface, in this case a small display mirror. The body panel from the second kit is going to be the buck here. Once mounted & reinforced from underneath so it does not move/flex, I cut a piece of embossing metal (Tin) about 9 inches long and 3 inches wide. Laid it over the buck and centered it front to back and side to side. Secured it with a strip of tape and began forming the panel.. I first, using a round wooden mixing stick roughed in the shape of the curved fairing in front of the engine, then working the tin to the front of the buck, started pushing the metal around the sides with my fingers (This stuff is really soft guys,its like stiff tin foil)It will stretch and form simple curves/shapes without much fuss. Once the sides were roughed in, I began tightening up the final shape with a wooden mixing stick and the blunt end of an exacto blade handle. Once the tin began to tighten up, at the sides,the tin began to split at the edge.This split was a bit premature but, there was a lot of metal stretching to come so I figured I could save the panel. After the stretching/shapeing was done. This is what I ended up with. A slight trimming on the edge and its ready for fitting!!! The last pic is the tools used to shape this and the scrap that was cut/sheared off...         Next time...More body work and final fitting of the fabbed panel...Stay tuned!!and thanks for tuning in! |
|
|
|
Post by pete on Aug 24, 2020 14:11:35 GMT -7
|
|
|
|
Post by mmthrax on Aug 25, 2020 7:36:06 GMT -7
Loving this.
I really appreciate the fab work.
Carry on sir....
|
|
|
|
Post by pete on Aug 25, 2020 17:53:48 GMT -7
Glad you like what your seeing Mark! I'm just happy the only real fab work on this was the body panel...So far...
|
|
|
|
Post by pete on Aug 25, 2020 18:28:43 GMT -7
|
|
|
|
Post by mustang1989 on Aug 26, 2020 6:13:56 GMT -7
Can't see it on this computer but will DEFINITELY be tuning in this evening to check this out. Hate the luck on the brittle plastic bro. Sounds like you're pulling through it though.
|
|
|
|
Post by pete on Aug 26, 2020 12:25:26 GMT -7
Just a bump in the road joe. If I were to let these things get to me...There would be a lot of crash test models on the floor over the years...LOL...Yeah, get in front of a good computer or your going to miss some good stuff!!
|
|
|
|
Post by pete on Aug 26, 2020 12:37:19 GMT -7
|
|
|
|
Post by mustang1989 on Aug 26, 2020 18:13:45 GMT -7
What a smooth recovery with that tin body Pete. Man that was some really good thinking!!! Glad you were able to figure it out and move on. Awesome stuff going on in this thread!!!
|
|
|
|
Post by sharp on Aug 27, 2020 17:30:56 GMT -7
K&G speed shop is only about a half hour away from my house.I used to go there all the time for my speed parts back in the 70's and 80's.I'll be checking in on this build for sure.Keep up the good work Pete it looks awesome!!
|
|
|
|
Post by pete on Aug 27, 2020 21:25:56 GMT -7
K&G speed shop is only about a half hour away from my house. I am soo jealous right now...LOL... Wonder if they still have that old rail kicking around??? Not much on the old interwebs pic wise regarding this digger. Going by ear on a few things with it. Going to try to capture the original look before they upgraded it with better injection and chrome. I like to do obscure stuff, problem is there isn't much for research material on the obscure stuff. Gotta take a little artistic licsense from time to time... |
|
|
|
Post by pete on Aug 27, 2020 21:38:18 GMT -7
|
|
|
|
Post by mmthrax on Aug 28, 2020 6:13:24 GMT -7
This is some great stuff here. I've never seen a dragster at my LHS, and never seen one built.
This is a real treat, especially with your extra goodies.
Carry on sir....
|
|
|
|
Post by pete on Aug 29, 2020 14:17:09 GMT -7
|
|
|
|
Post by mustang1989 on Aug 29, 2020 16:34:27 GMT -7
All that detail is so clean and crisp that it'd pass for the real thing. That embossing metal worked out great for that belly pan too. Great idea.
|
|
|
|
Post by pete on Aug 29, 2020 17:53:38 GMT -7
Thanks Joe! I do try to get it as convincing as I can. I do love my embossing metal. Its great for floor pans/body panels heat shielding to name a few...The list goes on man!!
|
|
|
|
Post by DeeCee on Aug 30, 2020 3:24:27 GMT -7
So much amazing scratch building and detailing going into this build Pete.... JUST AWESOME SIR !!!!
|
|
|
|
Post by pete on Aug 30, 2020 13:22:01 GMT -7
Thank you Dale...I think the scratch building is half the fun...Sometimes...LOL.
|
|
|
|
Post by mmthrax on Aug 31, 2020 7:43:49 GMT -7
Yes sir!!!
Fantastic progress.
Really enjoying this.
|
|
|
|
Post by pete on Aug 31, 2020 14:30:30 GMT -7
Glad your enjoying the progress/process Mark!
|
|