|
|
Post by pete on Aug 6, 2020 19:27:05 GMT -7
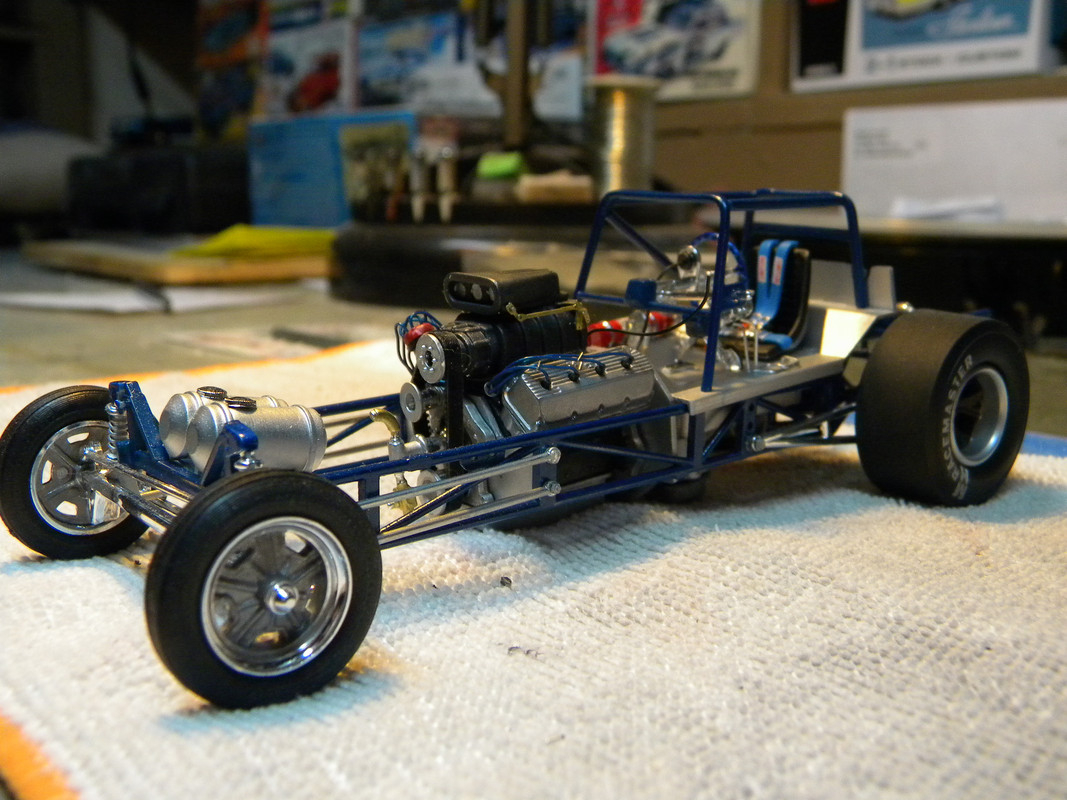
Ok as stated in the languishing projects thread: Its' been in the box since 99' I was not happy with the paint/decals so. It got parked. Here's where its at right now. I acquired another kit and pilfered the body/decals for this chassis. Ironed out the body issues with this one and filled the trunk/hood seams on the body. ( Not supposed to be body seams on this Hawiian FC) I failed to do this with the original and it caused me much angst... I trimmed out the cockpit with a scratch built hydraulic throttle pedal. Installed a smaller diameter Cal Custom steering wheel. Finished it off with some lines/nozzles for the fire bottle and a couple brake lines from the M/C. Not gonna go nutz on this one, just do a couple fuel lines, finish out the body and call it good. It was never going to be a show car anywhoo. Just a descent display piece when its done...I hope...     |
|
|
|
Post by pete on Aug 6, 2020 19:39:44 GMT -7
Heres a couple pics of the Hyrdaulic Throttle pedal in case you missed it...   |
|
|
|
Post by pete on Aug 8, 2020 11:14:17 GMT -7
|
|
|
|
Post by DeeCee on Aug 8, 2020 17:01:02 GMT -7
That is some very nice detail work there Pete.
|
|
|
|
Post by mustang1989 on Aug 8, 2020 17:45:48 GMT -7
..............and there it is!! Gonna be glued to the set here.
|
|
|
|
Post by pete on Aug 8, 2020 17:53:58 GMT -7
Thanks fellas...Just de-canted the blue paint for this monster. Once it gasses off...LOOK OUT...Sad part is... the actual car never ran a race, it was flipped and wrecked on its first pass down the track.
|
|
|
|
Post by leon on Aug 8, 2020 17:59:32 GMT -7
Really nice detail work Pete!
|
|
|
|
Post by pete on Aug 9, 2020 14:08:00 GMT -7
Thanks fellas  OK, its painted, Tamiya Racing blue decanted from the rattle can. Gotta give it some dry time, then its a light wet sanding for the purpose of surface correction. Then a base coat of clear for the decals.   |
|
|
|
Post by pete on Aug 10, 2020 11:59:55 GMT -7
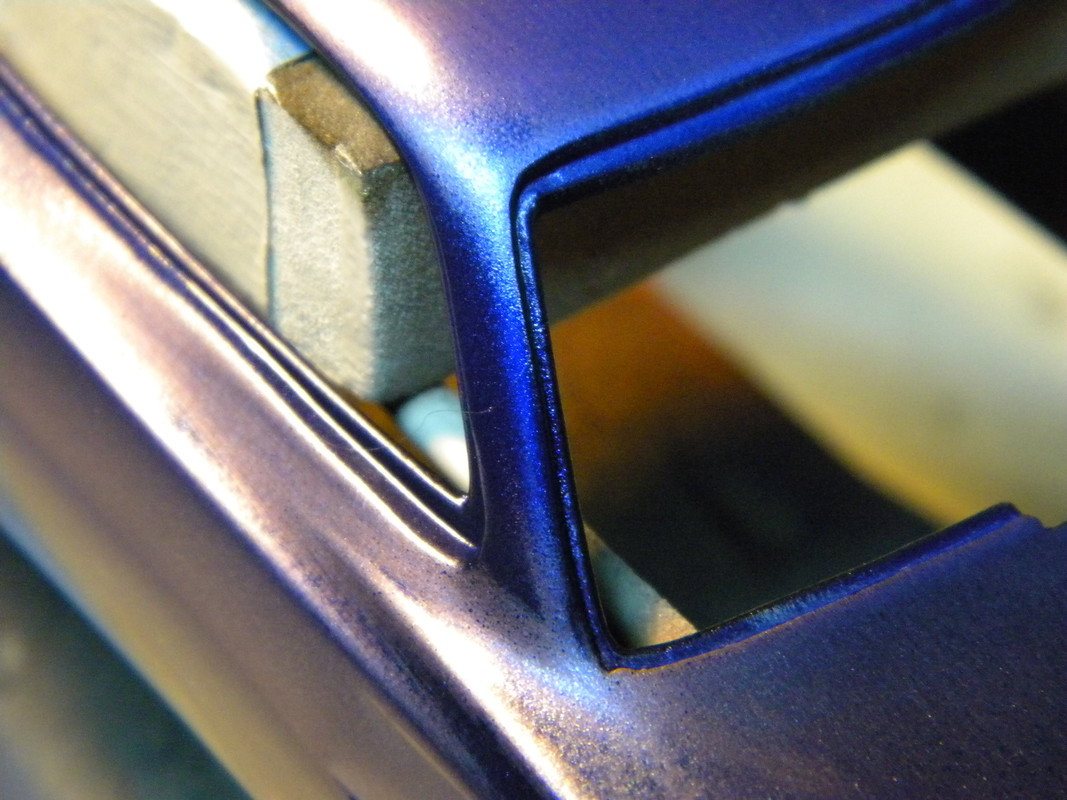
OK. "Surface correction" Fancy term for wetsanding the paint...LOL...But, necessary if you want a gloss finish that looks like you can dip your hand into it. So as you can see in the first pic, the paint finish has a bit of a texture to it. Commonly referred to as "Orange peel" Since that is what it resembles. Have to make this orange peel go away for a truly deep gloss finish. Now before anyone freaks out! Its been said many times that you can not wetsand a metallic finish. B.S. You can, you just have to be careful to only sand in one direction on a panel, try to sand all the panels in the same direction. As with any finish, you want it to be uniform in appearance after sanding. Note the difference between the roof and the rear deck in the next pic. When you are done sanding, the whole paintjob should have this uniform appearance, see next two pics. Just as when doing body work, don't sand the edges of a panel, sand to em. Gotta go slow and carefully so you don't burn through the paint like I did!...LOL...Yeah, cut the paint right off the edge of this A pillar. This is a perfect opportunity to say, decanting paint from a spray can and shooting it through an air brush is the way to go if you are using a rattle can color. You can always come back and re-touch the area. You want to use low air pressure so you don't blow paint everywhere and you want to reduce(thin out)the paint so it flows out at low pressure. If you don't reduce it, it will look like sandpaper when you are done due to the low pressure setting. It is a balancing act between paint that is thin as water and getting good coverage so be patient and take your time (Don't Rush it...ever) Painting should always be a relaxed, deliberate process. This repair took 3 LIGHT coats to hide the burn through and come back to the original color before wetsanding. Once its dry, wet sand it...More carefully than the first time and yes, LOL, the cat hair will be gone too. If you are using a rattle can...You obviously cant thin the paint but..You can achieve the same result. You will have to mask the paint off so you only paint the damaged area and still do light coats till you achieve uniform hiding of the damaqed area. You will have a hard edge to cut down when you sand it but go slow and it will clean up fine. I hope this long winded installment helped out somebody. Publications are quick to give you a tutorial on how to do a paint job, none of em ever seem to give tips on how to fix problems that pop up soo...I figured this was a good opportunity to do so. Any questions, please feel free to ask. Next installment will discuss a coat of clear and decals. stay tuned!!! And thanks for looking.      oops!  1 st coat  2nd coat  3 rd coat |
|
|
|
Post by pete on Aug 10, 2020 12:24:49 GMT -7
Sorry...Forgot to add: Tamiya rattle can paints can be reduced with lacquer thinner. (so can their acrylics) So go to your local hardware store and get a gallon of cheap lacquer thinner. Its great for reducing many paints and its great for cleaning your air brush too. And...You can soak crusty dried paint off/out of spray can nozzles with it also.
|
|
|
|
Post by leon on Aug 10, 2020 14:08:03 GMT -7
Paint looks really good Pete!
|
|
|
|
Post by stitchdup on Aug 11, 2020 2:32:38 GMT -7
Some useful tips, thanks Pete
|
|
|
|
Post by pete on Aug 11, 2020 14:51:45 GMT -7
|
|
|
|
Post by stitchdup on Aug 12, 2020 3:17:30 GMT -7
Hope you can get the decals Pete
|
|
|
|
Post by mustang1989 on Aug 12, 2020 3:27:38 GMT -7
|
|
|
|
Post by pete on Aug 12, 2020 8:46:08 GMT -7
Decals are NOT available. If the other billboard goes on with out cracking/splitting like the driver side one. AND lays down with setting solution...Maybe...Lets just say the prognosis is...guarded...
|
|
|
|
Post by stitchdup on Aug 12, 2020 9:11:09 GMT -7
Can you find them on ebay maybe? theres usally thousands to look through there
|
|
|
|
Post by pete on Aug 12, 2020 9:26:59 GMT -7
Yeah...I could end up with another 20yr old dried out set too. I have one more trick up my sleeve Les...Fat lady aint singin' yet! LOL...Maybe tonight I'll get it squared away. Thinking about painting on the roof stripes as we speak.  |
|
|
|
Post by pete on Aug 12, 2020 9:49:22 GMT -7
|
|
|
|
Post by sharp on Aug 12, 2020 19:37:01 GMT -7
Looks great Pete! Very nice work on the engine and interior. The paint is looking pretty sweet too.
|
|
|
|
Post by pete on Aug 13, 2020 8:04:01 GMT -7
Thank you sir!  |
|
|
|
Post by pete on Aug 13, 2020 11:59:27 GMT -7
|
|
|
|
Post by mustang1989 on Aug 14, 2020 8:12:59 GMT -7
That.....is one heckuva update Pete. Glad to see that you are pressing forward on this one. It's been crazy at work otherwise I would've posted before now. Really good build going on in here for a "display piece".
|
|
|
|
Post by pete on Aug 14, 2020 13:49:50 GMT -7
Thanks Joe, Its one of those models that simply refuses to be built, no matter what I do. But, its only plastic/paint and glue. It will come together, even if I have to use duct tape!!
|
|
|
|
Post by pete on Aug 14, 2020 14:01:23 GMT -7
|
|
|
|
Post by stitchdup on Aug 14, 2020 16:11:15 GMT -7
They look ok to me mate
|
|
|
|
Post by pete on Aug 15, 2020 13:18:07 GMT -7
Thanks Les...I appreciate it.  |
|
|
|
Post by mmthrax on Aug 15, 2020 13:20:20 GMT -7
Just got caught up on this one.
Looking good sir. Lots of great detail.
Looks like your hard work is about to really pay off with a stunning finish.
Carry on sir....
|
|
|
|
Post by pete on Aug 15, 2020 14:32:25 GMT -7
Thanks Mark...This has been a never ending source of pain and torture. But yeah, getting close on it now...
|
|
|
|
Post by pete on Aug 15, 2020 14:41:20 GMT -7
|
|